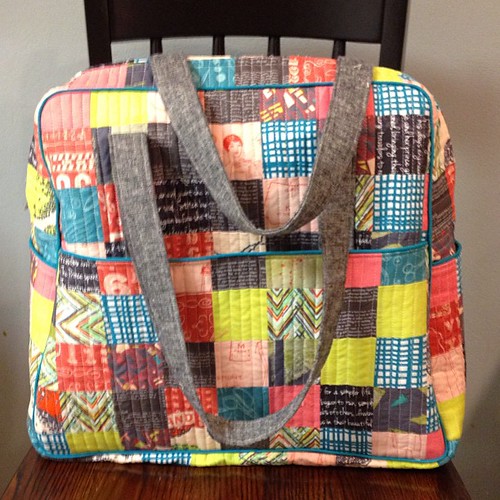
It's pretty awesome, right? I was inspired by all the patchwork bags I saw popping up in instagram right before they all left for Sewing Summit. I was particularly inspired by Lucy and Norman. She made such a lovely bag. But when I succumbed to the Black Friday purchase of the Cherry Limeade bundle from Pink Castle Fabrics, I knew just what to do with it!
I used the construction method that Elizabeth Hartman outlines here on her blog, Oh Fransson!. I did a couple of things differently though. I started out with 2.5" squares and sewed them into patchwork panels slightly larger than the pattern pieces. I then made my quilt sandwich with batting (cut 1/2" smaller) and canvas (cut the pattern size). I quilted 3/8" apart. That part was particularly boring.
The only part that I wasn't able to use this on was the Top Panel pieces. There I cut my batting to size and used the exact QAYG method from the link above. I started in the middle of the shape (for lack of a better word), and extended it from both sides. This way I was able to use up some of the weirdly shaped pieces left over from cutting up the fat quarters.
I also changed the handles. I cut my material at 5" wide instead of what the pattern recommends, and added some length (I forget the exact measurement. I held it up to my body until it felt right.). I also used a medium weight interfacing, so the handles seem pretty squishy & sturdy, all at the same time.
I'm undecided if I want to use purse feet! I've never used them before and I'm kinda scared to cut holes in the bottom of my bag! We'll see how brave I get.
I didn't have any trouble finding the zipper at Hobby Lobby. I decided to go with the 24". When I was still sewing it all together, I had my zipper come unattached from the other side. gasp! Apparently I got one of those zippers that are used for jackets? I've thrown away the package, so I'm not sure what kind of zipper to never buy again. Thankfully it was pretty easy to put the zipper back onto the other set of zipper teeth.
If I had to make another Weekender Bag, I think that I would forgo the piping around the main parts of the bag. That was a lot of trouble to match up when I was sewing my bag together, and it made it terribly obvious when I wasn't exactly on the 1/2" seam.
Also: I forgot to add that my sewing machine just wasn't cutting it for this project! I could barely fit the bag underneath the sewing foot. So I took that off. It still wasn't getting close enough to that 1/2" seam allowance that I needed. So I took off the part that holds onto the 1/4" foot I usually use. Basically, all I had was the bar sticking down that attaches to the sewing feet, and a very quickly moving needle. I'm glad to report there are no bandages on my fingers.
Beth
Fabric Details: Cherry Limeade Bundle from Pink Castle Fabrics & Essex Linen in Black